How to Print a plan in Garden Planner
First click on the Preview tab to show the preview view.
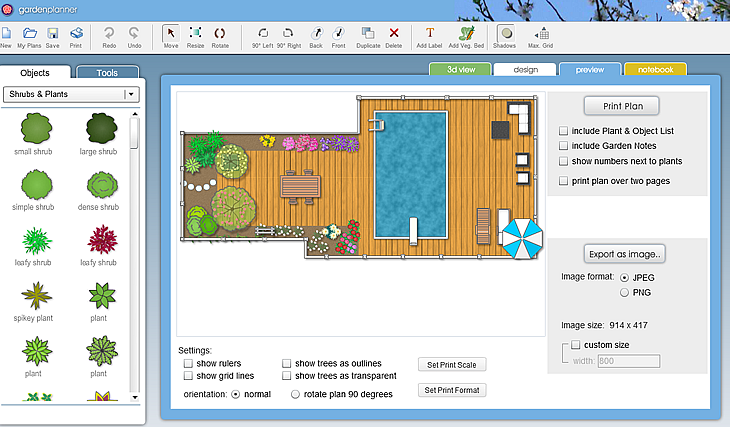
On the top right corner you will see the Print Plan button with a number of options under it.
What these options mean.
![]() check this option to include in the print out the list of all plants and objects in the plan
check this option to include in the print out the list of all plants and objects in the plan
![]() check this option to include in the print out any garden notes you may have added to your plants
check this option to include in the print out any garden notes you may have added to your plants
![]() check this option to include numbers next to plants so that you can use the plant list as a key for the plants in your design. Note: you can change how this numbering is displayed. Choose Object Display Settings from the Settings menu. From there you can change font size for the numbering, the layout of the numbering and if there is circle displayed behind the number for clarity.
check this option to include numbers next to plants so that you can use the plant list as a key for the plants in your design. Note: you can change how this numbering is displayed. Choose Object Display Settings from the Settings menu. From there you can change font size for the numbering, the layout of the numbering and if there is circle displayed behind the number for clarity.
If you click the Print Plan button it will show the operating System Print dialog box.
On Windows it will look like this.
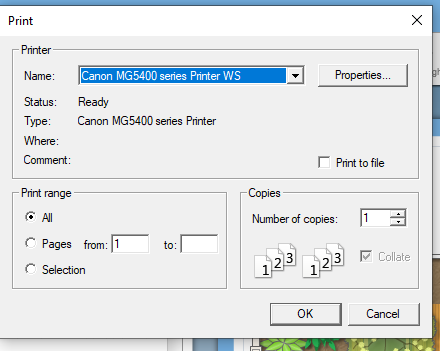
If you just click OK it will print your plan and scale to fill the page (provided you haven't changed any printer settings)
and on a Mac it will first show you an option for page set up
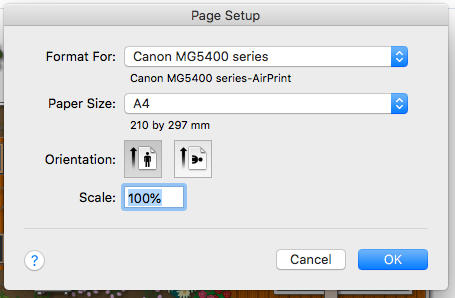
and then shows the printer settings
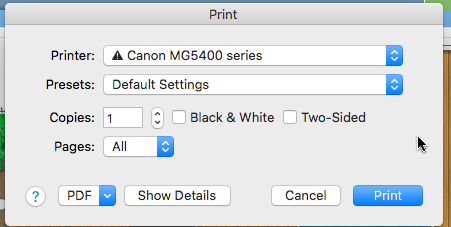
If you just click Print it will print your plan and scale to fill the page (provided you haven't changed any printer settings)
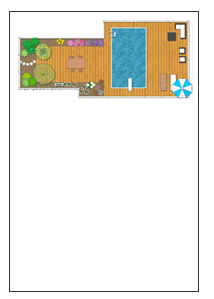 Please note: it will make sure that the whole plan is printed and scaled to match your selected page orientation and size. If you have a wide plan and print in portrait orientation you may end up with a print out like this (see left). In this case you will get a better result if you print in landscape mode ( or select the rotate plan 90 degrees option in the Preview window)
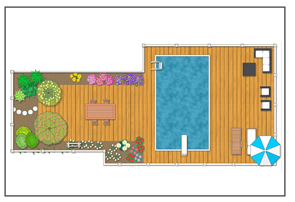
Resulting in a layout like this:
Troubleshooting: if your plan is not printing as you would expect check the properties for your printer. In Windows click on the Properties button next to the printer name.
On a Mac click the first page setup dialog lets you select the scale and orientation for the printing. And the Print dialog lets you set if the plan is printed in color or black and white. On a Mac you adjust more print settings by clicking on the show details button.

You will then have a range of options that are specific to your printer.
More Printing Options:
By default Garden Planner will scale your plan to fill the page of whatever paper you are printing to. In most cases this will be the best option to pick. However if you want your plan printed to a specific scale click on the Set Print Scale button next to the Print Settings options.
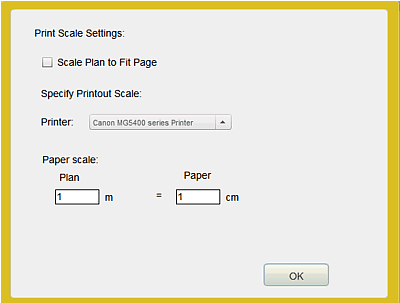 Printing to Scale lets you set a scale like 1cm on the paper is equal to 1m on the plan (or 1inch on the paper is equal to 2 feet on the plan). To specify a print scale first uncheck the Scale Plan to Fit Page option.
Then select the printer you want to print to. You need to select a printer because different printers may be printing to different paper sizes. If you only have one printer then you may not need to select this.
Garden Planner will automatically calculate the best possible scale for your plan. The calculation is based on making a whole number relationship between the plan and paper scales. What that means is that if you are using Metric measurements then it will choose a scale like 1m = 1cm or 1m = 5cm or 3m =1m (or for US measurements it would be something like 1ft = 1inch or 1ft=5inch or 3ft = 1inch). Garden Planner tries to choose the best scale based on the default paper size for your printer.
If you want to you can set your own scale by entering your own values for the plan or paper scale.
If you want Garden Planner to calculate the best scale for a different paper size first change the paper selection in your printer settings then click the Set Print Scale button. Typically changing the printer paper option can done just be clicking the print button, changing the printer paper settings and then canceling the print option. You can then set the print scale and print.